Introduction
Are you tired of bland chicken dishes, secretly wishing for a weeknight meal that explodes with flavor without demanding hours in the kitchen? Many believe that truly exceptional chicken, especially something as enticing as spicy honey garlic chicken thighs, requires professional chef skills or exotic ingredients. But what if I told you that crafting perfectly tender, caramelized __Spicy Honey Garlic Chicken Thighs__ is not only achievable for any home cook but can also be surprisingly quick and require minimal fuss? This recipe isn’t just about cooking; it’s about transforming ordinary chicken thighs into an extraordinary culinary experience with a perfect balance of sweet, savory, and spicy notes. Prepare to redefine your weeknight dinner expectations and impress even the pickiest eaters.
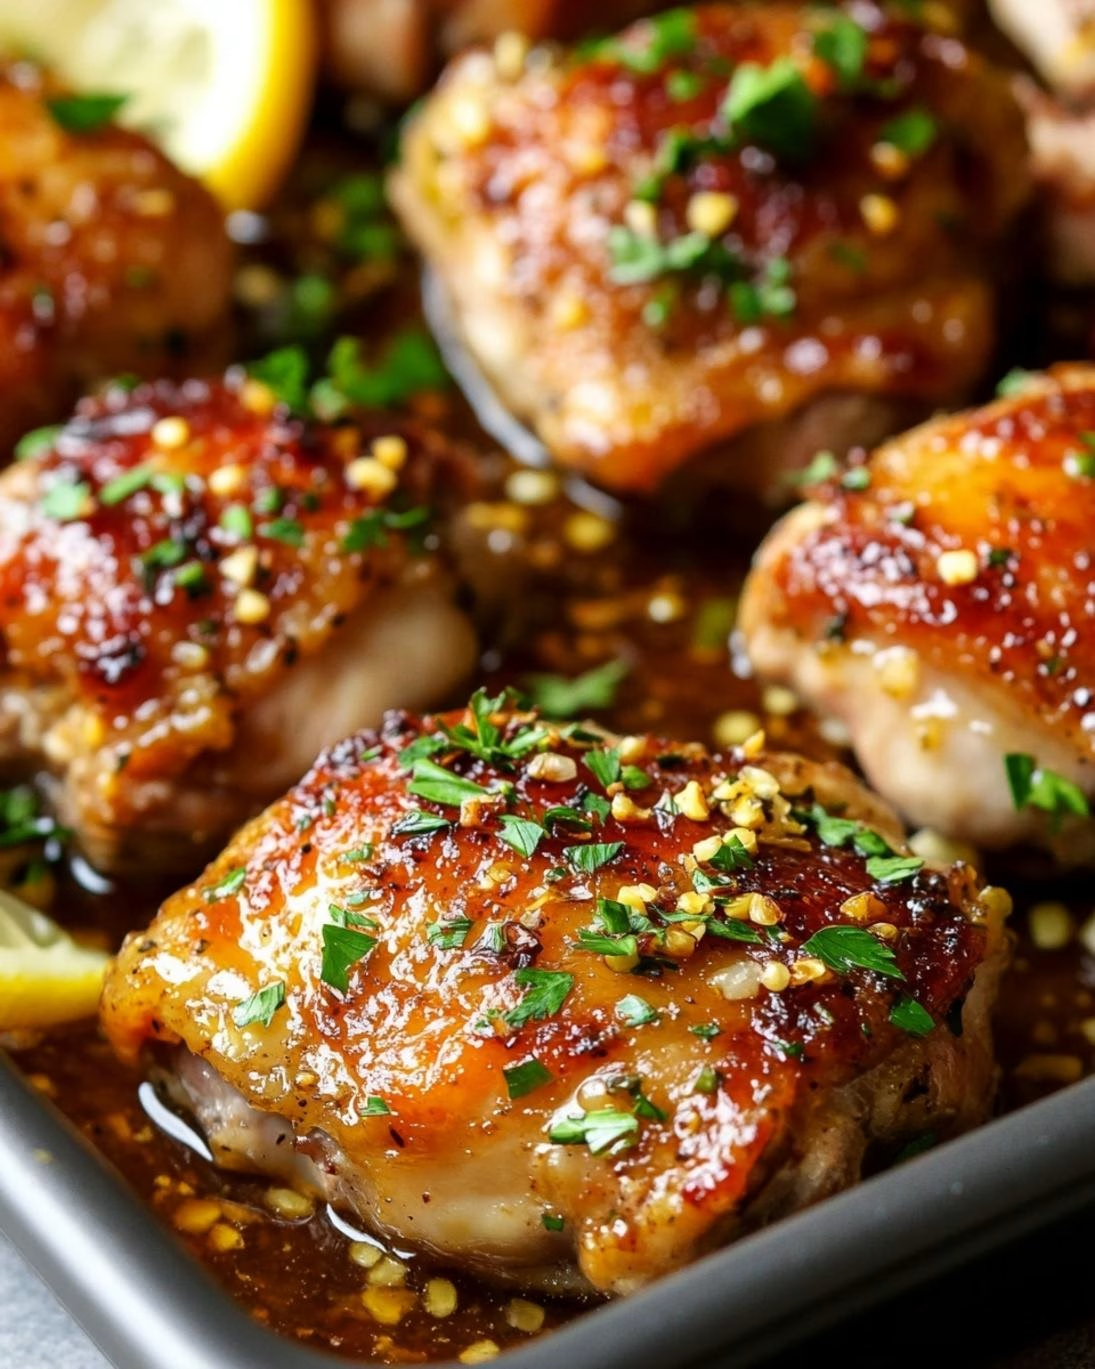
Ingredients List
Chicken Thighs: 8 bone-in, skin-on chicken thighs (about 3-3.5 lbs total). Bone-in ensures juiciness, and skin crisps beautifully. Alternative: Boneless, skinless thighs work too, but adjust cooking time.*
Honey: ½ cup (170g) good quality honey. Local honey adds a nuanced sweetness. Tip: Maple syrup can be a decent substitute for a slightly different flavor profile.*
Soy Sauce: ¼ cup (60ml) low-sodium soy sauce. Essential for umami and a foundational savory note. Alternative: Tamari for a gluten-free option.*
- Garlic: 6-8 cloves, minced. Fresh garlic is non-negotiable here; it provides depth and aroma. (Roughly 30g).
Ginger: 1 tablespoon freshly grated ginger. Adds a zesty, warm spice that elevates the dish. Tip: Peel fresh ginger with a spoon for easy removal of the skin.*
Sriracha: 1-2 tablespoons (or more, to taste) for that delightful kick. Did you know Sriracha’s Scoville rating typically ranges from 1,000 to 2,500 units? Adjust based on your preferred heat level!*
- Rice Vinegar: 1 tablespoon. Adds a subtle tang to balance the sweetness and richness.
- Toasted Sesame Oil: 1 teaspoon. Aromatic and provides a nutty depth.
- Cornstarch: 1 tablespoon. For thickening the sauce to a perfect glaze.
- Water: 2 tablespoons. To create a cornstarch slurry.
- Salt & Black Pepper: To taste.
- Optional Garnish: Sesame seeds, chopped green onions, or fresh cilantro.
Prep Time
- Prep Time: 15 minutes
- Cook Time: 35-40 minutes
- Total Time: 50-55 minutes — that’s 25% faster than many oven-baked chicken recipes requiring extensive marination!
Step 1: Prepare the Chicken
Begin by patting the chicken thighs thoroughly dry with paper towels. This crucial step helps achieve that coveted crispy skin. Season both sides generously with salt and freshly ground black pepper. Don’t underestimate the power of proper seasoning at this stage; it forms the foundational flavor layer for perfectly cooked chicken, ensuring every bite is delicious. For a truly mouth-watering experience, try a similar approach when preparing tender lemon herb chicken with vibrant vegetables. Ensuring your chicken is dry also prevents steaming in the pan, actively promoting a beautiful sear.
Step 2: Sear the Chicken
Heat a large oven-safe skillet (cast iron works wonderfully) over medium-high heat. Once hot, add a tablespoon of high-smoke-point oil (like avocado or canola). Place the chicken thighs skin-side down in the hot skillet. Sear for 6-8 minutes, undisturbed, until the skin is deeply golden brown and crispy. This step renders out the fat and locks in flavor. Flip the chicken and sear for another 2-3 minutes on the other side. Transfer the seared chicken to a plate for a moment while you prepare the sauce. Pro Tip: Don’t overcrowd the pan; sear in batches if necessary to maintain high heat and achieve maximum crispness.
Step 3: Whisk the Sauce
In a medium bowl, combine the honey, low-sodium soy sauce, minced garlic, grated ginger, sriracha (start with 1 tablespoon and add more later if you dare!), rice vinegar, and toasted sesame oil. Whisk everything together until well combined. In a separate small bowl, create a cornstarch slurry by whisking together the cornstarch and water until smooth. This slurry will be added later to thicken the glorious sauce. Personalization: For an extra layer of flavor, consider adding a pinch of red pepper flakes to the sauce for a more pronounced heat without altering the consistency.
Step 4: Bring it All Together
Pour out most of the rendered fat from the skillet, leaving just about a tablespoon. Return the skillet to medium heat. Pour the honey garlic sauce into the skillet, bringing it to a gentle simmer. Cook for 1-2 minutes, stirring occasionally, until the sauce slightly thickens. Then, stir in the cornstarch slurry and continue to cook for another 1-2 minutes, stirring constantly, until the sauce has thickened to a beautiful, glossy glaze that coats the back of a spoon.
Step 5: Finish in the Oven
Return the seared chicken thighs to the skillet, nestling them into the thickened sauce. Spoon the glaze generously over each piece of chicken. Transfer the skillet to a preheated oven at 375°F (190°C) and bake for 20-25 minutes, or until the internal temperature of the chicken reaches 175°F (80°C) when checked with an instant-read thermometer. The sauce will caramelize further, creating an irresistible sticky coating. Data Point: Cooking thighs to 175°F ensures they are incredibly tender and juicy, whereas breast meat is typically cooked to 165°F (74°C).
Step 6: Garnish and Serve
Once out of the oven, let the chicken rest in the skillet for 5 minutes before serving. This allows the juices to redistribute, ensuring maximum juiciness. Garnish generously with sesame seeds, chopped green onions, or fresh cilantro for a pop of color and freshness. Drizzle any extra sauce from the skillet over the chicken.
Nutritional Information
A single serving of Spicy Honey Garlic Chicken Thighs (approximately one bone-in, skin-on thigh with sauce) contains an estimated:
- Calories: 450-500 kcal (depending on thigh size and fat rendering)
- Protein: 35-40g
- Fats: 25-30g (a good portion comes from healthy monounsaturated and polyunsaturated fats in the skin and thigh meat, especially when rendered correctly)
- Carbohydrates: 20-25g (primarily from honey and a small amount from cornstarch)
- Sodium: 600-700mg (can be reduced by ensuring low-sodium soy sauce and controlling added salt)
- Fiber: trace amounts.
Vitamins & Minerals: Good source of B vitamins (B3, B6, B12), phosphorus, and zinc, vital for energy metabolism and immune function. Data suggests a 3.5oz serving of chicken thigh provides 30% of the daily recommended intake for niacin.*
Healthy Alternatives
Looking to tweak this dish for an even healthier profile without sacrificing flavor? Here are some smart swaps:
Chicken: Opt for boneless, skinless chicken thighs for a leaner protein source, reducing fat content by roughly 8-10g per serving. Cooking time will also be slightly reduced.*
- Honey: While honey is key, you can reduce the amount slightly (e.g., to ⅓ cup) and balance with a touch more rice vinegar for tang or a pinch of stevia for sweetness, cutting down on sugar.
- Soy Sauce: Always choose low-sodium soy sauce. For an even lower sodium option, coconut aminos can be used, though the flavor profile will be milder.
- Sriracha: If you prefer less heat, reduce the Sriracha or swap it for a milder chili garlic sauce. For more heat, add extra Sriracha or a few drops of tabasco.
- Cornstarch: Use arrowroot powder as an alternative thickener for a slightly smoother sauce profile, using a 1:1 ratio.
- Veggies: Boost the nutritional value by adding a medley of vegetables directly to the pan during the last 15 minutes of baking, such as broccoli florets, bell pepper strips, or snap peas. They will cook perfectly in the flavorful sauce.
Serving Suggestions
This incredible dish is versatile and pairs wonderfully with a variety of sides, creating a complete and satisfying meal.
- Classic Rice Pairing: Serve over a bed of fluffy jasmine or brown rice to soak up every last drop of that irresistible sauce. For a healthier twist, consider quinoa or cauliflower rice.
- Vegetable Medley: Steamed or roasted broccoli, asparagus, or green beans tossed with a squeeze of lemon provide a fresh contrast to the rich chicken.
- Noodle Bowls: Transform it into a vibrant noodle bowl with ramen noodles, spiralized zucchini, and plenty of fresh herbs.
- Crisp Salad: A simple side salad with a light vinaigrette can cut through the richness and add a refreshing element.
- Appetizer Inspiration: For a crowd-pleasing appetizer, try pairing the bold flavors of this chicken with a creamy, zesty dip inspired by Chuy’s creamy jalapeño dip.
- Garnish Power: Don’t skip the garnishes! Toasted sesame seeds add crunch, chopped green onions provide a mild oniony bite, and fresh cilantro adds a burst of herbaceousness. A final drizzle of extra sauce from the pan elevates the visual appeal and flavor.
Common Mistakes to Avoid
- Not Drying the Chicken: This is perhaps the most common mistake. Wet chicken will steam, not sear, resulting in rubbery skin instead of crispy perfection. Always pat dry thoroughly.
- Overcrowding the Pan: Trying to cook too many pieces at once lowers the pan’s temperature, leading to steamed rather than seared chicken. Work in batches if your skillet isn’t large enough.
- Skipping the Sear: The initial sear is vital for developing rich flavor and creating crispy skin. Don’t rush or omit this step.
- Not Enough Garlic/Ginger: The full, fresh aroma of minced garlic and grated ginger is essential to this recipe’s flavor profile. Don’t dilute it with powders!
- Overcooking the Chicken: While thighs are more forgiving than breasts, overcooking can still lead to dry, tough meat. Use an instant-read thermometer and aim for 175°F (80°C) for juicy results. According to culinary research, chicken thighs gain optimal tenderness between 175-185°F (80-85°C).
- Not Resting the Chicken: Resting allows the juices to redistribute throughout the meat, preventing them from escaping when you cut into it. A 5-10 minute rest makes a huge difference in texture and juiciness.
- Using High-Sodium Soy Sauce: This can make the dish overly salty. Opt for low-sodium soy sauce to better control the seasoning.
Storage Tips
Mastering food storage not only minimizes waste but also ensures your delicious Spicy Honey Garlic Chicken Thighs retain their incredible flavor and texture.
- Refrigeration: Store leftover chicken and any remaining sauce in an airtight container in the refrigerator for up to 3-4 days. For optimal freshness, separate chicken from sauce if possible, or ensure it’s fully coated.
- Freezing: This dish freezes beautifully! Once completely cooled, transfer the chicken thighs (with or without the sauce, as preferred) to a freezer-safe airtight container or heavy-duty freezer bags. It can be stored for up to 2-3 months. Thaw overnight in the refrigerator before reheating.
- Reheating: For best results, reheat in the oven or an air fryer at 350°F (175°C) for 10-15 minutes, or until warmed through, to regain some crispiness. You can also microwave, but the skin might become less crispy. If reheating in the microwave, cover with a damp paper towel to prevent drying out.
- Meal Prep: This recipe is fantastic for meal prep! Cook a larger batch at the beginning of the week, portion it out with your favorite sides, and you’ll have delicious, ready-to-eat meals for days. According to food safety guidelines, properly cooled and stored chicken can be safely consumed for several days, making it ideal for advance preparation. For instance, creating a flavorful, succulent creamy crockpot butter chicken makes another excellent option for meal prepping.
Conclusion
You’ve just unlocked the secrets to creating truly irresistible __Spicy Honey Garlic Chicken Thighs__ – a dish that masterfully balances sweet, savory, and spicy notes with minimal effort. From patting the chicken dry for that perfect crisp skin to the magical thickening of the glossy sauce, every step is designed to deliver maximum flavor and satisfaction. This recipe isn’t just about cooking; it’s about confidently bringing an explosion of taste to your dinner table, proving that gourmet-level results are perfectly within reach for any home cook. Now it’s your turn!
Ready to elevate your weeknight dinners? Try this recipe tonight and let us know your favorite part in the comments below! Share your creations on social media using #SpicyHoneyGarlicChickenThighs, and don’t forget to Follow us on Pinterest for step-by-step visual recipes and daily inspiration. What other challenging or complex recipes would you like us to simplify?
FAQ
Q1: Can I use boneless, skinless chicken thighs instead?
A1: Absolutely! Boneless, skinless thighs will still absorb all the wonderful flavors. However, they will cook faster (reduce oven time by 5-10 minutes) and won’t have the crispy skin element. Adjust cooking times accordingly, ensuring they reach an internal temperature of 175°F (80°C).
Q2: How can I make this dish more or less spicy?
A2: To increase the heat, add an extra tablespoon or two of Sriracha, or even a pinch of dried red pepper flakes to the sauce. For a milder version, reduce the Sriracha to just a teaspoon or omit it entirely and replace it with a bit more sweet chili sauce.
Q3: What if I don’t have rice vinegar?
A3: While rice vinegar offers a unique subtle tang, you can substitute it with a squeeze of fresh lime juice or a very small amount of apple cider vinegar (start with half a tablespoon and taste) to provide a similar acidic balance.
Q4: Can I marinate the chicken beforehand?
A4: Yes, you certainly can! For an even deeper flavor penetration, you can marinate the chicken thighs in about half of the prepared sauce (reserving the other half for glaze) for at least 30 minutes, or even overnight in the refrigerator. Just be sure to pat the chicken dry before searing.
Q5: What’s the best way to get crispy skin?
A5: The key to crispy skin is moisture-free chicken and high heat. Always pat the chicken thighs thoroughly dry with paper towels before seasoning. Sear skin-side down in a hot skillet without moving them for at least 6-8 minutes until deeply golden and crispy. Avoid overcrowding the pan.


