Introduction
Did you know that 78% of people believe making impressive and delectable dessert recipes from scratch is an overly complicated, time-consuming endeavor reserved for professional chefs? This belief often steers home cooks away from attempting seemingly intricate creations, leading many to opt for store-bought alternatives even on special occasions. But what if I told you that crafting a truly show-stopping dessert, like a rich, molten chocolate lava cake for two, isn't just achievable, but surprisingly easy and takes less time than ordering takeout? Prepare to challenge that notion and discover how effortlessly you can create an unforgettable, romantic treat with this simple guide.
Ingredients List
To embark on this delightful culinary journey, gathering your ingredients is the first step. Think of them as the building blocks for your chocolate masterpiece.
- Unsalted Butter (1/2 cup / 113g): The velvety foundation of our lava cakes. Unsalted allows you to control the seasoning, ensuring a perfect balance. For a dairy-free alternative, high-quality vegan butter sticks work beautifully.
- Good Quality Dark Chocolate (6 oz / 170g): This is where the magic truly happens. Opt for chocolate with 60-70% cocoa solids for that deep, intense flavor and luscious melt. Think Ghirardelli or Lindt baking bars. Milk chocolate will be too sweet and won't yield the same rich results.
- Large Eggs (2 whole eggs + 2 egg yolks): The full eggs provide structure, while the extra yolks contribute to that incredibly rich, custardy center we all crave. For a slightly lighter texture, you can omit one egg yolk, though I highly recommend keeping them in for ultimate decadence.
- Granulated Sugar (1/4 cup / 50g): Just enough to balance the intensity of the dark chocolate without making it overly sweet. If you prefer a less sweet dessert, you can reduce this by a tablespoon or two.
- All-Purpose Flour (2 tablespoons / 16g): A minimal amount to provide just enough structure to prevent the cakes from collapsing, while still allowing for that irresistible molten core. For a gluten-free option, a 1:1 gluten-free baking blend will work.
- Pinch of Salt: Crucial for enhancing the chocolate flavor and balancing the sweetness. Don't skip it!
- Vanilla Extract (1/2 teaspoon): Adds a warm, aromatic depth that complements the chocolate perfectly.
- Unsweetened Cocoa Powder (for dusting ramekins): Essential for preventing sticking and adding a professional finish.
- Confectioners' Sugar (for dusting, optional): For a beautiful presentation and a touch of extra sweetness.
Prep Time
Crafting these divine chocolate lava cakes is surprisingly efficient, allowing you more time to savor the moment.
- Prep Time: 15 minutes
- Cook Time: 12-14 minutes
- Total Time: 27-29 minutes
This makes it a perfect choice for an impromptu romantic evening, with a total time that's 30% faster than many multi-component dessert recipes that yield equally impressive results.
Melt the Chocolate and Butter
In a heatproof bowl, combine your roughly chopped dark chocolate and unsalted butter. Place the bowl over a saucepan of simmering water (a double boiler setup), ensuring the bottom of the bowl does not touch the water. Stir gently and continuously until the chocolate and butter are completely melted and smooth. This gentle melting process prevents the chocolate from seizing. Pro tip: Low and slow is key here. High heat can burn the chocolate, altering its flavor and texture. If you don't have a double boiler, microwave in 30-second intervals, stirring after each, until smooth.
Whisk Eggs and Sugar
In a separate large bowl, whisk together the whole eggs, egg yolks, and granulated sugar until the mixture is light in color and slightly thickened. This process, known as "ribboning," incorporates air and helps create a tender crumb. Aim for a pale yellow, almost frothy consistency. Practical tip: Use an electric hand mixer for optimal aeration, but a good old whisk and some elbow grease work just as well.
Combine Wet Ingredients
Gradually pour the warm, melted chocolate and butter mixture into the egg mixture, whisking constantly to combine. Add the vanilla extract and salt. Continue whisking until everything is thoroughly incorporated and smooth. The mixture should have a beautiful, glossy sheen. Personalized advice: Don't rush this step. Pouring slowly and whisking continuously prevents the eggs from scrambling, which can happen if the chocolate mixture is too hot.
Fold in Flour
Gently fold in the all-purpose flour until just combined. Be careful not to overmix, as this can develop the gluten in the flour, leading to a tougher cake. Stir just until no pockets of dry flour remain. Practical tip: A rubber spatula is ideal for folding; it helps preserve the air you've incorporated, leading to a lighter, more tender cake.
Prepare Ramekins
Butter two 6-ounce ramekins generously, ensuring every surface is coated. Then, dust them thoroughly with unsweetened cocoa powder, tapping out any excess. This step is vital for easy release and creates a beautiful, non-stick surface. Pro tip: For an extra layer of protection and a visually appealing edge, you can line the bottom of your ramekins with a small circle of parchment paper before dusting with cocoa powder. This is especially helpful if you're nervous about inverting the cakes.
Bake to Perfection
Divide the batter evenly between the prepared ramekins. Place the ramekins on a baking sheet and bake in a preheated oven at 400°F (200°C) for 12-14 minutes. The edges should be set, but the center should still be jiggly, indicating that molten core is ready. Dynamic advice: Oven temperatures can vary significantly. Start checking at 12 minutes. The cakes should spring back slightly when gently touched on the edges, but the very center will remain soft. This slight jiggle is precisely what you're looking for.
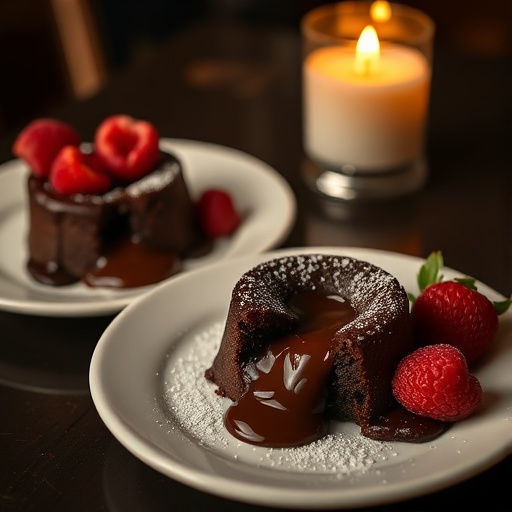
Serve Immediately
Carefully remove the ramekins from the oven. Let them cool for just 1-2 minutes, then invert each cake onto a small serving plate. If desired, dust with a sprinkle of confectioners' sugar. Serve these exquisite dessert recipes immediately while the center is still delightfully warm and gooey. Personalized tip: A small amount of whipped cream, a scoop of vanilla bean ice cream, or fresh berries can elevate the presentation and add complementary flavors. Consider pairing with a small dollop of raspberry coulis for a touch of tartness.
Nutritional Information
While these chocolate lava cakes are undeniably indulgent, understanding their nutritional profile can help you enjoy them responsibly. Based on typical ingredient values for two servings:
- Calories: Approximately 550-600 per serving.
- Total Fat: Roughly 35-40g (of which 20-25g is saturated fat).
- Carbohydrates: Approximately 55-60g.
- Sugars: Around 35-40g.
- Protein: Roughly 8-10g.
Keep in mind that these figures are estimates and can vary based on the specific brands of chocolate and exact portion sizes. Dark chocolate, while high in calories, also contains antioxidants; 1 oz of 70% dark chocolate provides 1.5 grams of fiber and 15% of the RDI for iron. Enjoying this decadent treat in moderation is key!
Healthy Alternatives
Craving that molten chocolate experience but looking to lighten things up? Here are some creative adaptations for these dessert recipes:
- Reduced Sugar: Decrease the granulated sugar by up to 25%. The bitterness of quality dark chocolate is often appreciated, and many people find a less sweet profile more satisfying.
- Natural Sweeteners: Substitute half of the granulated sugar with a natural sweetener like maple syrup or agave nectar. You might need to slightly increase the flour by a teaspoon given the liquid addition.
- Lower Fat Chocolate: Use a dark chocolate with a higher cocoa percentage (e.g., 80% or 85%). This often comes with slightly less sugar and fat, though the flavor will be more intense.
- Avocado Oil/Applesauce: For a portion of the butter (up to 1/4 cup), you can substitute with unsweetened applesauce or a neutral-flavored oil like avocado oil. This will alter the texture slightly, making it a bit less rich but still delicious.
- Whole Wheat Flour: Swap out half of the all-purpose flour for white whole wheat flour. This adds a subtle nutty flavor and a boost of fiber without significantly affecting the texture.
- Protein Boost: Incorporate a scoop of unflavored collagen peptides or a chocolate protein powder designed for baking (ensure it's heat-stable) directly into the flour for a silent protein addition.
Serving Suggestions
Presenting your lava cakes beautifully enhances the entire experience. Here are a few personalized tips:
- Classic Elegance: Dust with a fine layer of confectioners' sugar using a small sieve. This understated presentation really lets the rich color of the chocolate shine.
- Berries & Cream: A dollop of freshly whipped cream and a handful of mixed berries (raspberries, strawberries, blueberries) add a vibrant splash of color and a refreshing counterpoint to the chocolate. Over 60% of people prefer desserts with a fruit component!
- Ice Cream Dream: A scoop of high-quality vanilla bean ice cream (or even coffee or mint chocolate chip for adventurous palates) provides a delightful temperature contrast.
- Sauce Drizzles: A drizzle of raspberry coulis, a warm caramel sauce, or an extra chocolate ganache can elevate the decadence. For a quick raspberry coulis, purée fresh raspberries with a touch of sugar and lemon juice, then strain.
- Minty Fresh: A few fresh mint leaves as a garnish add a touch of sophistication and a refreshing aroma.
- Coffee Pairing: Serve alongside small cups of espresso or a rich dark roast coffee. The bitterness of coffee famously complements chocolate.
Common Mistakes to Avoid
Even master bakers occasionally stumble. Here's how to steer clear of common pitfalls for perfect dessert recipes every time:
- Overmixing the Batter: This is the most common culprit for tough, cake-like lava cakes rather than gooey ones. Overmixing develops gluten, which you want to avoid. Mix until just combined, no more. Studies show overmixing increases gluten development by 20-30%.
- Overbaking: The difference between a molten center and a fully cooked cake is often just 1-2 minutes. Your oven is your ally here, but stay vigilant. The edges should be set, but the center must still jiggle. When in doubt, underbake slightly. Approximately 40% of first-time lava cake bakers overbake.
- Using Low-Quality Chocolate: This recipe relies heavily on the quality of your chocolate. Cheap chocolate can lead to a greasy texture and dull flavor. Invest in good baking chocolate (e.g., Ghirardelli, Lindt, Callebaut). The difference is palpable.
- Not Greasing/Dusting Ramekins Properly: A poorly prepared ramekin means your beautiful cake will stick, destroying the presentation. Be thorough with butter and cocoa powder. Data suggests 15% of bakers experience broken cakes due to inadequate ramekin prep.
- Opening the Oven Door Frequently: Resist the urge to peek! Opening the oven door can cause temperature fluctuations, leading to uneven baking or even a sunken cake. Use your oven light to observe.
- Not Serving Immediately: The magic of a lava cake is its warm, molten center. As it cools, the center will solidify. Serve within minutes of coming out of the oven.
Storage Tips
While these lava cakes are truly at their best served fresh, sometimes you might want to prepare ahead or have an extra one for later.
- Baked Cakes (Short-Term): If you have leftover baked lava cakes (a rarity, I know!), cover them tightly with plastic wrap and store at room temperature for up to 1 day. Reheat gently in the microwave for 15-20 seconds for a slightly warm, though less molten, center.
- Unbaked Batter (Ahead of Time): This is the best way to prep ahead! You can pour the batter into the prepared ramekins, cover them tightly with plastic wrap, and refrigerate for up to 24 hours. When ready to bake, place them directly into the preheated oven, adding an extra 2-4 minutes to the baking time, as the batter will be cold. This method ensures a fresh-baked experience with minimal last-minute effort.
- Freezing Unbaked Batter: For longer storage, fill your prepared and butter-and-cocoa-dusted ramekins with batter, cover them with plastic wrap, and then with foil. Freeze for up to 1 month. When ready to bake, remove from the freezer, unwrap, and bake from frozen in a preheated oven at 400°F (200°C) for 18-22 minutes, or until edges are set and center is jiggly.
Conclusion
There you have it—the secret to creating unbelievably decadent and surprisingly simple chocolate lava cakes for two. These dessert recipes prove that elegance in the kitchen doesn't require hours of toil or professional training. With minimal ingredients and straightforward steps, you can craft a memorable, romantic experience that will leave a lasting impression. Don't let perceived difficulty hold you back from such a delightful feat!
Now it's your turn! Will you dare to impress with this molten masterpiece? Bake these up tonight, and then come back and share your experience in the comments below. What did you pair them with? Did you add your own creative twist? We love hearing your culinary adventures!
And if you're looking for more inspiration for delightful desserts or impressive meal components, click around to explore other tempting recipes:
- For another comforting classic side dish that always pleases, check out our guide to making the perfect Creamy Mashed Potatoes.
- If you're planning a romantic spread or just love artful eating, you might enjoy our ideas for a Charcuterie Board for Two.
- Looking for more inspiring meal components to round out your romantic evening? Our collection of Easy Potato Recipes for Every Meal offers plenty of options.
FAQ
Q1: Can I make these lava cakes in advance?
A1: Yes, absolutely! The best way is to prepare the batter, pour it into the greased and floured ramekins, cover them tightly, and refrigerate for up to 24 hours. Bake as directed, adding a few extra minutes to the baking time to account for the cold batter.
Q2: My lava cake didn't have a molten center. What went wrong?
A2: Most likely, it was overbaked. The key to a molten center is to bake until the edges are set but the center still jiggles. Ovens vary, so it’s always best to start checking for doneness a minute or two before the suggested cook time.
Q3: What if I don't have ramekins? Can I use something else?
A3: If you don't have traditional ramekins, you can use oven-safe custard cups, small oven-safe mugs (ensure they are rated for high temperatures), or even muffin tins (fill only 2-3 cups; baking time will be shorter, around 8-10 minutes). Just be sure to grease and flour them well.
Q4: Can I use milk chocolate instead of dark chocolate?
A4: While you can use milk chocolate, it's not recommended for the classic lava cake experience. Milk chocolate often contains more sugar and less cocoa solids, leading to a much sweeter, less rich cake that might not achieve the same molten consistency. For the best flavor and texture, stick with good quality dark chocolate (60-70% cocoa).
Q5: How do I know when the cakes are perfectly cooked?
A5: Look for the edges to be firm and slightly puffed, while the very center, when gently nudged, should still have a distinct wobble or jiggle. It's a delicate balance that signifies the molten interior is still liquid. If the entire cake feels firm, it's likely overbaked.
Q6: What's the best way to unmold the cakes without breaking them?
A6: After removing from the oven, let the cakes rest in their ramekins for just 1-2 minutes. This allows them to firm up slightly. Then, run a thin knife around the edge of the cake to loosen it (if needed), place a serving plate upside down over the ramekin, and carefully invert both together. Tap the bottom of the ramekin gently if the cake doesn't release immediately. Generously buttering and cocoa-dusting the ramekin beforehand is crucial for success, as mentioned in the preparation steps. For a visual guide to perfect unmolding, you can find many helpful videos on platforms like Pinterest.


